
DIY Headwraps
I was in a crafty mood yesterday and decided to make some of these adorable head wraps I've seen floating around on pinterest. I was shocked at how inexpensive and easy they were to make - so I am here to encourage you to give it a try! Only one small problem - the only darling girl I have in my possession was away at school when it came time for a photoshoot this morning! Thankfully right across the street lives maybe the cutest little chub Ive ever laid eyes on so I scampered over and borrowed her for a few minutes to model for me.

I bought a variety of stretch fabrics from good ol Joanns and just freehanded an easy bow pattern. I bought 1/4 yard of 8 different fabrics and the total was less than $20. Each 1/4 yard of fabric will yeild 2 headwraps (or possibly 3 for newborn size).I also found some fabrics in the dancewear section that were fun! Look around - anything stretchy will work!


I think its darling to mix patterns - so some my bows were sewn in a different fabric. But you can certainly use the same fabric for the headband and the bow.

To make the headwrap simply cut a piece of fabric that is 8 inches wide by head circumference. (My toddler wraps were all 8"x 16" - but some of the fabrics had more stretch than others, so make adjustments as necessary).
Once your fabric is cut, fold in half, right sides together (inside out), and sew along the long edge.

Then turn right side out and insert one end of your headband inside the other open end.

Once the end is tucked inside the other you will have a headband formed. To create the gather that you tie the bow around, you need to fold each side in towards the center.
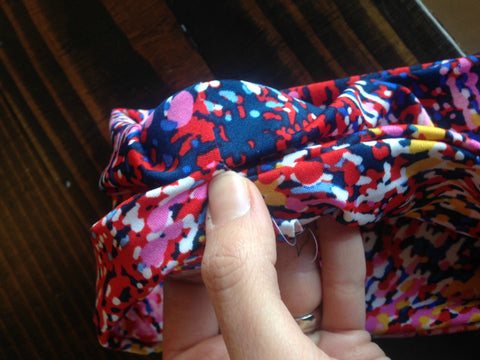
then zig zag stitch to hold in place. Dont worry if this looks pretty - you will be tying a bow over the seam.

Now that your headband is done - you need to make the bow. Here is a free template from Carissa Miss if you aren't comfortable freehanding. Fold your fabric and cut out 2 identical bows. Sew them right sides together, leaving a space to turn right side out.

I never stitch shut the opening after its turned because you tie it in a knot and it doesn't show.Finish off your head wrap by tying the finished bow around the center gathered seam of your headband.

Enjoy!!!

Here are a few more adorable pictures of the headwraps in action in case you need a little more inspiration :)


Cutest baby gift ever, and in all honesty these are completely ageless. My first grader wore one all day yesterday and I'm going to sew myself some next! Easy breezy. If you give it a try tag me on instagram so I can admire your work!!! (christyatthetopknot).
xoxo
Christy


Comments
Christy Beal said:
Thanks Colby!!!! I am so excited to go to SNAP too! So many fun things going on!!! Thanks for popping in and sharing!
Colby @ Love Joy Glitter said:
Love this! Shared :-) Can’t wait to meet you at SNAP!!! <3
Hailey said:
I want that striped and gold one for Evelyn! So cute!